INTRODUCTION
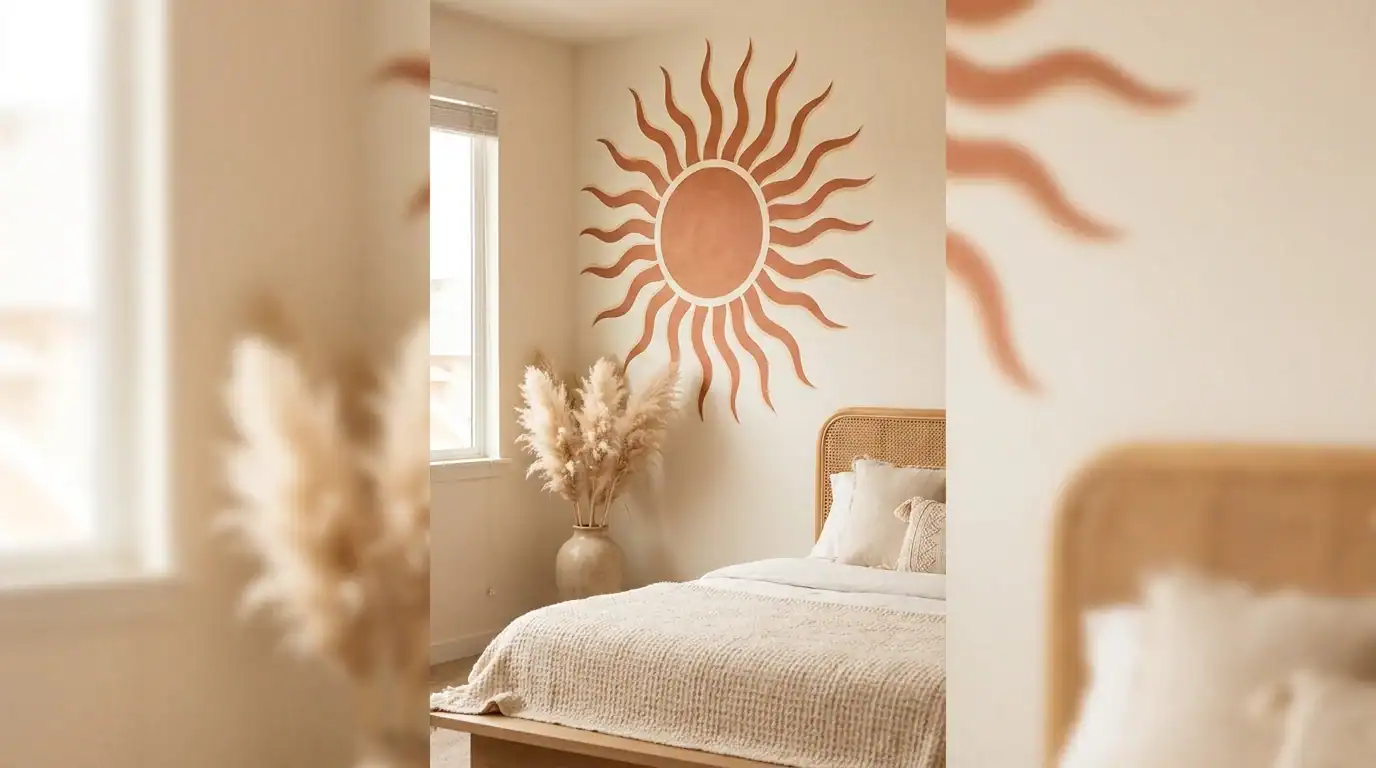
A plain wall can make a room feel incomplete. Also, store-bought sun art or wallpaper murals often cost too much for a single accent wall. This guide fixes that. By the end, you’ll know how to plan, sketch, and paint a boho sun wall mural. You’ll use basic craft paint and tools you probably already have.
This method uses a simple compass-and-string technique to draw the sun’s circle and rays, instead of freehanding the whole design. Freehanding is a common mistake for beginners. One uneven ray or a lopsided circle can ruin the entire mural. Once the paint dries, fixing it is tough. Drawing the guide lines first means your paint job goes on cleanly the first time.
Before you start:

- Time Required: 4-6 hours, spread across one weekend (including dry time)
- Difficulty Level: Beginner
- Estimated Cost: Roughly $20-$60, depending on how many paint colors you use and whether you already own basic tools
To create a boho sun wall mural, start by sketching a circle with rays using a pencil, string, and painter’s tape. Then, fill in the design with 2-3 matching craft paint colours. The whole project takes seven steps, from prepping the wall to sealing the finished paint. Key insight: Sketch your complete guide (circle and all rays) in pencil first. This way, you can erase mistakes instead of painting over them.
Table of contents
What You’ll Need For Sun Wall Mural
Tools
- Pencil: for sketching the sun’s outline directly on the wall; light marks are easy to erase or paint over
- Painter’s tape: keeps edges sharp and shields the wall
- String and a pushpin (or a large compass): turns the string into a makeshift compass so your circle comes out perfectly round
- Level: keeps your horizontal guideline straight, which keeps the whole sun from tilting
- Angled and round craft paintbrushes: the angled brush handles ray edges, the round brush fills the center circle;
- Small foam roller: gives the circle a smooth, even base coat without visible brush strokes
- Drop cloth or old sheet : catches drips on the floor and baseboards
Materials
- Craft or wall paint, 2-3 colors: one base color for the sun’s face and one or two accent colors for the rays; a small 8-ounce craft paint jar covers most mural sizes
- Primer (optional): only needed if you’re painting over a dark or glossy wall color; one small can is enough for a single mural
- Matte or satin clear sealer: protects the mural from scuffs, especially in hallways or kids’ rooms.
Requirements Table
|
Item |
Approximate Cost |
Where to Buy |
Essential? |
|---|---|---|---|
|
Craft paint (2-3 colors) |
$10-$20 total |
Amazon, IKEA, craft stores |
Yes |
|
Painter’s tape |
$5-$8 |
Amazon, hardware store |
Yes |
|
String + pushpin |
Under $2 (or use items on hand) |
Any home |
Yes |
|
Level |
$8-$15 |
Amazon, hardware store |
Yes |
|
Craft paintbrush set |
$8-$12 |
Amazon, craft stores |
Yes |
|
Mini foam roller |
$4-$6 |
Amazon, hardware store |
Optional |
|
Primer |
$10-$15 |
Hardware store |
Optional |
|
Clear sealer spray |
$8-$12 |
Amazon, hardware store |
Optional |
STEP-BY-STEP INSTRUCTIONS
Step 1: Choose and Plan Your Sun Design

Decide on the sun’s size, ray style, and color palette before you touch the wall. Boho sun murals usually range from 2 to 4 feet across, with either straight rays, wavy rays, or a mix of both. Start by sketching your idea on paper. Decide how many rays you want; 12 to 20 is great for most walls. Also, think about where the mural will go in relation to furniture like a headboard or couch.
Common Mistake: Skipping the paper sketch and going straight to the wall. Without a plan, it’s easy to end up with rays that are too thin, too crowded, or uneven in length.
💡 Pro Tip: Odd numbers of rays (like 15 or 17) often look more natural and less “clip art” than even numbers.
Step 2: Prep the Wall Surface

Clean the wall with a damp cloth to remove dust and grease, then let it dry fully. If the wall is dark, glossy, or has patches, apply one coat of primer. Let it dry for at least 2 hours before continuing. Lay your drop cloth along the baseboard to catch drips.
Common Mistake: Painting directly over a dusty or greasy wall. Paint won’t grip properly, and you’ll see brush marks or peeling later.
💡 Pro Tip: A magic eraser works well for spot-cleaning scuffs before you prime or paint.
Step 3: Mark Your Center Point and Guideline

Use your level to draw a light, straight horizontal pencil line at the height where you want the sun’s center. Mark the exact center point on that line — this is where your string or compass will anchor. Double-check the height looks right by standing back several feet before you commit to it.
Common Mistake: Eyeballing the center height instead of measuring. A mural that’s even slightly off-center from furniture below it will look wrong once everything else is in the room.
💡 Pro Tip: Stand across the room and take a photo on your phone — crooked or off-center placement is much easier to spot in a photo than in person.
Step 4: Draw the Sun’s Circle

Pin one end of your string to the center point and tie a pencil to the other end, adjusting the length so it matches your circle’s radius. Keeping the string taut, swing the pencil in a full circle around the center point to trace a perfect guide line. If you don’t have a pushpin option, a large compass or a circular object (like a round platter) works as a stand-in for smaller murals.
Common Mistake: Letting the string go slack partway through the circle. Any slack changes the radius mid-swing, leaving you with a lopsided oval instead of a circle.
💡 Pro Tip: Tape the string to the wall at the center point instead of relying on a pushpin if you’re worried about damaging plaster.
Step 5: Sketch and Tape the Rays

Draw evenly spaced lines from the centre to the edge of the circle. Use a ruler for straight lines or draw wavy ones freehand. When you’re satisfied with the spacing, place painter’s tape along both edges of each ray. Press the tape edges down firmly to stop paint from seeping underneath.
Common Mistake: Spacing rays by eye instead of measuring. Uneven gaps between rays are one of the most noticeable mistakes in a finished mural, even from across the room.
💡 Pro Tip: A protractor app on your phone can help you divide the circle into equal angles if you’re using more than 12 rays.
Step 6: Paint the Base Circle and Rays

Roll one even coat of your base colour inside the circle with the foam roller. Then, use the angled brush to paint each taped ray. Let the first coat dry completely. Check your paint can for the drying time, usually 1-2 hours. Then, apply a second coat for full, even coverage. Peel the tape off slowly at a 45-degree angle while the final coat is still a bit tacky. This helps create the cleanest edge.
Common Mistake: Removing the tape too late, after the paint has fully cured. Dried paint can crack or peel away with the tape instead of leaving a crisp line.
💡 Pro Tip: Test your peel angle on a taped scrap of cardboard first if you’re unsure about timing.
Step 7: Add Boho Details and Seal the Mural

When the main sun and rays are dry, add extra boho touches. You can include a smaller inner circle, dotted accents, or a two-tone ray pattern. Use a fine round brush for this. Let all paint cure for at least 24 hours. Then, apply one to two light coats of clear sealer spray from about 12 inches away. This will protect the design from scuffs and fading.
Common Mistake: Sealing before the paint has fully cured. Trapped moisture under the sealer can cause cloudiness or a tacky finish that never fully hardens.
💡 Pro Tip: In a kids’ room or hallway, a satin sealer holds up to more touching and cleaning than a fully matte one.
COMMON MISTAKES TO AVOID
Mistake 1: Painting Without a Pencil Guide
Some beginners skip the pencil sketch entirely and paint freehand to save time. This usually causes uneven rays and a circle that goes off-round halfway through. Fix it by erasing and re-marking with the string-compass method from Step 4. Then, pick up a brush again. Pencil lines wipe away or can be painted over easily, but wet paint mistakes do not.
Mistake 2: Using Too Many Colors
A boho sun mural can start to look busy or cartoonish with more than three paint colors. This usually happens when someone wants every ray to stand out individually. Use one base colour and one or two matching accent tones. Vary the width or spacing of the rays to add visual interest, not the number of colours.
Mistake 3: Rushing the Tape Removal
Removing painter’s tape too quickly or in the wrong direction can tear the fresh paint edge. This leaves a jagged line instead of a smooth one. This happens most often when someone is excited to see the finished result. Slow down, pull at a 45-degree angle, and stop immediately if you feel resistance score along the tape edge with a craft knife first if needed.


