
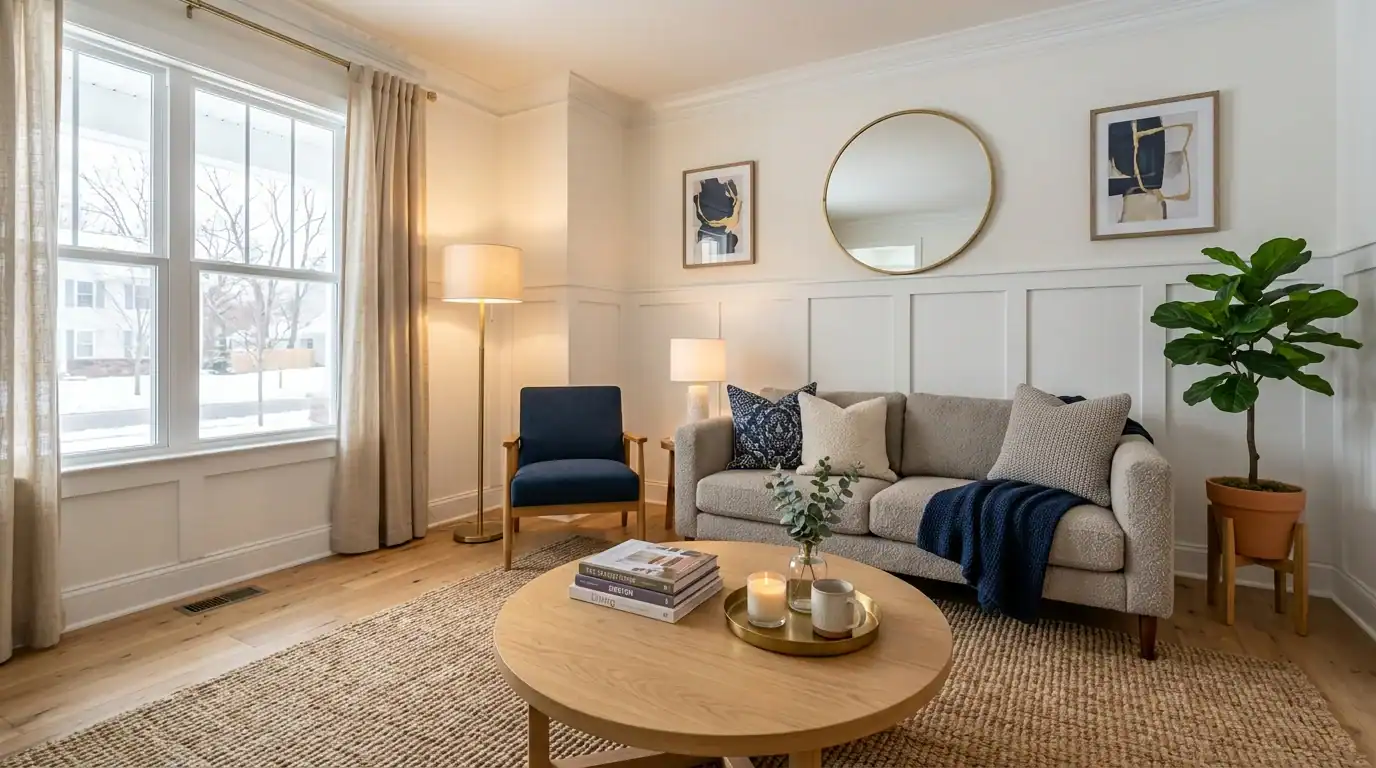
Your walls feel flat, and picking a wall style feels hard. This guide shows modern wainscoting ideas and how to get the look today.
Wainscoting means wall panels on the lower part of a wall. Beadboard means thin, grooved boards. Each step gives exact sizes, so you skip the top mistake: the wrong panel height.
This post may contain affiliate links. I may earn a small commission at no extra cost to you.
Quick Answer Modern wainscoting uses flat panels in one soft color. Make three moves: set the height at one third of the wall. Then paint it warm white and add navy and brass. Skip curvy, busy trim.

Table of contents
Wainscoting and Beadboard Styles at a Glance

|
Element |
What to Choose |
What to Skip |
|---|---|---|
|
Colors |
Warm white, soft greige, or sage. Add navy as one dark accent. |
Stark bright white. More than three colors |
|
Materials |
Primed MDF or PVC panels. Smooth wood boards. |
Thin, unprimed sheets that dent easily. |
|
Size or Scale |
32 to 36 inches tall on an 8-foot wall. 3-inch frame boards |
Panels that split the wall in half. Tiny 1-inch trim. |
|
Lighting |
Warm 2700K bulbs. One brass plug-in wall lamp. |
Cold 5000K bulbs. One harsh ceiling light alone. |
|
Decor |
One large round mirror. One brass lamp. One navy throw. |
Small frames hung inside each panel box. |
|
Budget Tip |
Primed MDF sheets. Cut your own boards |
Custom millwork for a first project. |
Step-by-Step Guide for Wainscoting and Beadboard Styles
Step 1:Pick Your Panel Style
Plain Explanation: Most wainscoting ideas fit three styles. Shaker has flat, square boxes with plain edges. Beadboard has thin boards with small grooves. Board and batten has flat boards with thin strips over the seams. For a modern living room, Shaker is the safest pick. Pick just one style for the whole room.
Done right when: One style covers the whole wall, and no two styles meet.
Your-Home Example: Picture a 12 by 14 foot living room with an 8-foot ceiling. Flat Shaker boxes in warm white keep it calm and tidy.
Common Mistake: Many people mix beadboard, Shaker, and board and batten in one room. It looks busy and confusing. The wall loses its calm look. Pick one style, and repeat it on every wall that gets panels.
Pro Tip: Tape a 20 by 24 inch paper box on the wall. Step back 6 feet. If it looks calm and not busy, the scale is right.

- Wall Molding Kit: the MDF board and batten wall panel kit includes 1 set of wall trim strips; The strips are 4cm wide an…
- Quality Material: this decorative wall panel is made of medium-density fiberboard (MDF), with a smooth, burr-free surfac…
- Flexible Installation: you can DIY the installation using decorative adhesive, screws, nails, or tape, depending on the …
Step 2: Set the Right Height

Plain Explanation: Use this rule of thumb: panels reach about one third of the wall height. On an 8-foot wall, that is 32 to 36 inches. On a 9-foot wall, aim for 36 to 40 inches. Mark the line on your wainscoting wall with a level (a bar with a bubble) and painter’s tape. Skip the middle of the wall.
Done right when: The tape line stays flat from corner to corner.
Your-Home Example: Picture a sofa with a 32-inch back. A 34-inch panel top then sits 2 inches higher, so the line looks planned.
Common Mistake: People often set the top edge right at the sofa back height. The two lines fight each other. The wall looks cut off. Move the panel top 2 to 4 inches above the sofa back.
Pro Tip: Measure from the floor at three spots. Floors often slope a little. Then link the marks with a level and tape.

- ★ DUAL MODES & SELF-LEVELING ★ The cross line laser with slide switch enable you to set 2 modes, self-leveling mode and …
- ★ HIGH VISIBILITY & ACCURACY ★ The powerful cross line laser easily project a red cross line at a wide angle of 110°to a…
- ★ HIGH PROTECTION GRADE ★ The line laser reaches IP54 protection grade (shock resistant, waterproof, dustproof, shockpro…
Step 3: Pick Your Colors

Plain Explanation: Pick one main color for the panels and the wall above. Warm white is the safest pick in soft winter light. Use satin (a soft sheen) on panels and matte (no shine) above. Add navy in one spot, like a chair. Keep the room to three colors and one metal.
Easy combos: warm white with a navy chair. Greige with white oak. Sage with a brass lamp.
Done right when: You test a 2 by 2 foot patch and like it at noon and at night.
Your-Home Example: Picture warm white panels, a greige sofa, and one navy chair. The room feels calm but not flat.
Common Mistake: People pick a bright, cold white. In winter light, it looks gray and flat. The wall feels cold. Choose a warm white with a hint of cream, and test a patch first.
Pro Tip: Paint a 2 by 2 foot patch on a sheet of board. Move it around the room. Check it at noon and at night.

- Use for a variety of indoor and outdoor project surfaces including wood, metal, plaster, masonry or unglazed ceramic
- Water-based acrylic formula is low odor, resist chips and provides long-lasting protection
- Covers up to 120 sq ft and dries to touch in 30 minutes for quick project completion
Step 4: Build or Buy the Panels

Plain Explanation: Pick your path. For beadboard, glue and nail 4 by 8 foot sheets, cut to 34 inches tall. For Shaker, build boxes 16 to 24 inches wide from 3-inch flat boards. Fix each piece into studs (wood posts inside the wall), about 16 inches apart. Use a brad nailer (a tool that shoots thin nails). Top it with a flat cap board.
Done right when: Every board sits flat, the top edge stays level, and all boxes match in size.
Your-Home Example: On a 12-foot wall, six boxes about 20.5 inches wide fit between seven 3-inch boards. Each box ends up the same size.
Common Mistake: People space boxes by eye. The last box ends up skinny, or a box hits a window edge. Do the math first: wall length minus board widths, divided by box count.
Pro Tip: Find studs first and mark them with tape. Wear safety glasses when you nail. Lay the boards out on the floor before you glue.

- Perfect Paintable Performance: Many ordinary craft boards absorb paint unevenly or peel easily after painting, leading t…
- Multi-Purpose Craft Base: Our high-quality MDF boards serve as a perfect budget-friendly alternative to traditional wood…
- Fully Customizable & Easy to Process:Our lightweight yet durable MDF sheets support full DIY customization. You can easi…
Step 5: Caulk, Fill, and Paint

Plain Explanation: Caulk (a flexible paste that seals gaps) hides every seam. Use paintable caulk only. Run a thin bead along the top edge and each corner. Fill nail holes with wood filler. Sand smooth and wipe off dust. Roll on one coat of primer (a base coat), then two coats of paint. Let each coat dry as the can says.
Done right when: From 3 feet away, you see no seams, no holes, and no brush lines.
Your-Home Example: Picture a thin bead of caulk along the top edge and every corner. After paint, the panels look like one clean piece.
Common Mistake: People skip caulk to save time. Gaps and nail holes then show up in side light. The wall looks unfinished. Seal every seam and hole before you paint, even small ones.
Pro Tip: Use a small foam roller on flat boards and a brush on edges. Roll in light coats to avoid drips. Two thin coats beat one thick coat.
- The information below is per-pack only
- Sold as 1 Each.
- Paint ready in only 30 minutes to finish the job faster..
Step 6: Style the Wall

Plain Explanation: Hang one round mirror, 30 to 36 inches wide, 4 to 6 inches above the panel top. Add one brass plug-in sconce (a wall lamp) near the sofa. Set 2700K bulbs in every lamp. K means kelvin, and low numbers glow warm. Keep the round coffee table 14 to 18 inches from the sofa. Drape one navy throw on the sofa.
Done right when: Warm light falls on the panels at night, and nothing hangs inside a box.
Your-Home Example: Picture the greige sofa under a round brass-framed mirror. A navy chair, an oak coffee table, and one brass lamp finish the corner.
Common Mistake: People hang small frames inside each panel box. The wall looks like a bulletin board. The panel lines get lost. Hang one large piece above the panels instead. Or leave some boxes bare.
Pro Tip: Add one tall plant, about 4 feet, in the corner to soften the lines. Use an odd number of pillows, like three.

- 5mm Copper-Free Silver Glass Made with 5mm copper-free silver glass for a clear reflection and long-lasting bathroom use…
- Soft Backlit LED with 3 Color Temperatures The LED backlight offers warm, neutral, and white light settings with adjusta…
- Touch Control & Memory Function Use the smart touch button to adjust brightness and color temperature. The memory functi…
Common Mistake TO Avoid When Wainscoting and Beadboard Styles

Cutting Panels Too Short
People pick 24 inches because it feels safe. But a short panel looks like a big baseboard (the trim at the floor). The wall looks cut off, and the room feels low. Stay at 32 to 36 inches on an 8-foot wall. Re-tape the line and step back to check.

Mistake 2: Forgetting Outlets and Switches

Many people build first and check outlets later. Then an outlet lands on a seam, and the cut looks messy. Mark every outlet before you cut. Use a box extender (a ring that moves the outlet out) so the cover sits flush. Turn off the power first.
Mistake 3: Using Cold, Harsh Bulbs

Cold bulbs, 5000K, make warm white panels look gray. Many people grab them because the box says bright. The room feels like an office. Swap in 2700K bulbs, and add one lamp at eye level. Soft winter daylight looks best with warm lamps.
Wainscoting and Beadboard Styles Frequently Asked Questions